gh user

The GitHub CLI is a useful tool when working within git repositories with one or more remotes configured to use GitHub. You can list issues and pull requests within your terminal, and even open pull requests:
gh pr create -f
This creates a pull request from the current branch - even prompting you to push it to a selected remote if not already in sync. It then outputs a link you can click on (often need to Ctrl+Click) and add details as you see fit, such as extra reviewers.
You can also add reviewers in the same command above, but I don’t always remember all my colleagues’ GitHub aliases. This is where another couple of gh commands come in handy: gh api and gh alias. I can define an alias that uses the current repo along with a partial name or login I specify, and will output a table of all matching users that can be assigned issues within that repository (people in one or more teams defined within the repository or owner, e.g. organization):
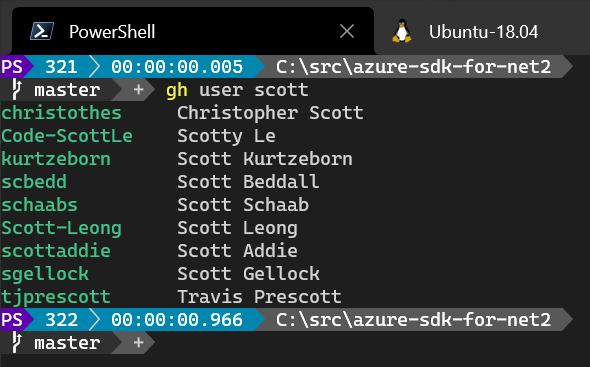
gh user scott
Updated: as of
ghversion 1.10 you can read multiline strings or strings with mixed quotes from stdin:gh alias set user - << 'EOF' api graphql --paginate --template '{{range .data.repository.assignableUsers.nodes}}{{printf "%-16s" .login | color "green"}}{{.name}}{{"\n"}}{{end}}' -F owner=':owner' -F repo=':repo' -F name='$1' -f query=' query ($repo: String!, $owner: String!, $name: String!, $endCursor: String) { repository(name: $repo, owner: $owner) { assignableUsers(first: 50, after: $endCursor, query: $name) { nodes { login name }, pageInfo { hasNextPage endCursor } } } } ' EOFSee here for more information. The original post continues below.
To configure an alias with mixed quotes, I found the easiest way currently is to modify the configuration file directly - at least as of gh version 1.9.2 (and it’s been that way for as long as I can remember using gh.
- Open ~/.config/gh/config.yml where ~ is your user profile directory e.g.
%USERPROFILE%on Windows or$HOMEon other platforms including WSL. Create the file if it does not exist. -
Add or edit the
aliasessection so it looks like this, keeping any existing contents that might be there already:# Aliases allow you to create nicknames for gh commands aliases: user: |- api graphql --paginate --template '{{range .data.repository.assignableUsers.nodes}}{{printf "%-16s" .login | color "green"}}{{.name}}{{"\n"}}{{end}}' -F owner=':owner' -F repo=':repo' -F name='$1' -f query=' query ($repo: String!, $owner: String!, $name: String!, $endCursor: String) { repository(name: $repo, owner: $owner) { assignableUsers(first: 50, after: $endCursor, query: $name) { nodes { login name }, pageInfo { hasNextPage endCursor } } } } ' ``` - Save and close the file.
Now whenever you run a command like gh user <name> you’ll see output like the following for matching names or logins: