Debugging tests in Linux containers with Visual Studio

Some recent tests failures for the Azure Key Vault Certificates client libraries for .NET required debugging on Linux, and while I frequently use WSL2 (even to write this post), I needed a fresh Ubuntu 18.04 image similar to our live testing agents. Fortunately, recent versions of Visual Studio 2019 have included the component “.NET Core Debugging with WSL 2”.
Follow the steps below to get started:
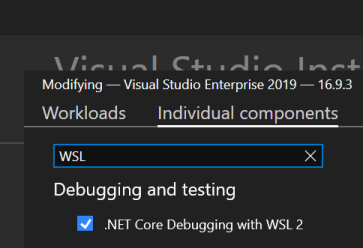
- Install “.NET Core Debugging with WSL 2”:
- Run “Visual Studio Installer”.
- Click Modify on the instance you want to modify.
- Click on Individual Components.
- Type “WSL” and press Enter.
- Check “.NET Core Debugging with WSL 2”.
-
Next you need to create a Dockerfile to install .NET 5.0. While you could start with an image that contains .NET already, I wanted to build up a fresh image to reduce the possibility of inadvertently changing the target environment. So instead I start off with plain
ubuntu:18.04:FROM ubuntu:18.04 # Install dependencies RUN apt-get update \ && apt-get install -y --no-install-recommends \ apt-transport-https \ ca-certificates \ curl \ openssh-server \ && rm -rf /var/lib/apt/lists/* # Install .NET RUN curl -sSL -o /tmp/packages-microsoft-prod.deb https://packages.microsoft.com/config/ubuntu/18.04/packages-microsoft-prod.deb \ && dpkg -i /tmp/packages-microsoft-prod.deb \ && apt-get update \ && apt-get install -y --no-install-recommends dotnet-sdk-5.0 \ && rm -f /tmp/packages-microsoft-prod.deb \ && rm -rf /var/lib/apt/lists/* -
You’ll build a container image using that Dockerfile. In the directory where you saved the Dockerfile, run:
docker build -t ubuntu:18.01-dotnet-5.0 .Since this is a relatively small image it should build pretty quickly. You can use any name after
-t. For more options, rundocker build --help. -
Once the image is done building, you can run it interactively to eventually run your tests. Replace “C:\repo” with the local path to the root of your repository (in case your tests refer to repo-relative file paths).
docker run -it -v C:\repo:/app:ro ubuntu:18.01-dotnet-5.0You can pass
--name {name}to give it a more recognizable name, or one will be generated for you (as seen in screenshots below). If you want the container to be deleted automatically after you’re finished, you can also pass--rm. -
In the interactive prompt inside the container, run your tests but make the runner wait for a debugger to attach using the
VSTEST_HOST_DEBUGenvironment variable:VSTEST_HOST_DEBUG=1 dotnet vstest /app/MyProject.Tests/bin/Debug/MyProject.Tests.dllThis will print some information along with the process ID you’ll need to remember:
Starting test execution, please wait... A total of 1 test files matched the specified pattern. Host debugging is enabled. Please attach debugger to testhost process to continue. Process Id: 42, Name: dotnet -
Now go ahead and start Visual Studio 2019 and load your solution if you haven’t already.
- Once loaded, set breakpoints, configure exception settings, etc., and attach to the
dotnetprocess running your tests to debug:- Click on the Debug menu.
- Click Attach to Process….
- Change the Connection type drop-down to “Docker (Linux Container)”
-
If your container is not discovered automatically, click the Find… button and wait a second or two. You should see it like in the following screenshot using an automatically generated name.
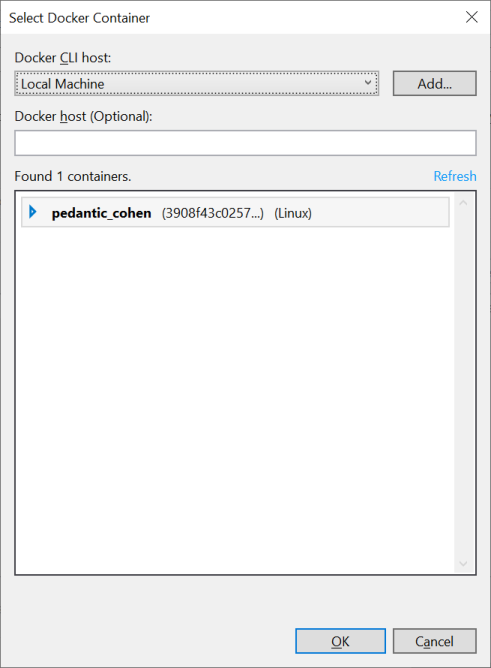
Click OK to continue.
-
Once the host is selected, select the process ID that was printed above:
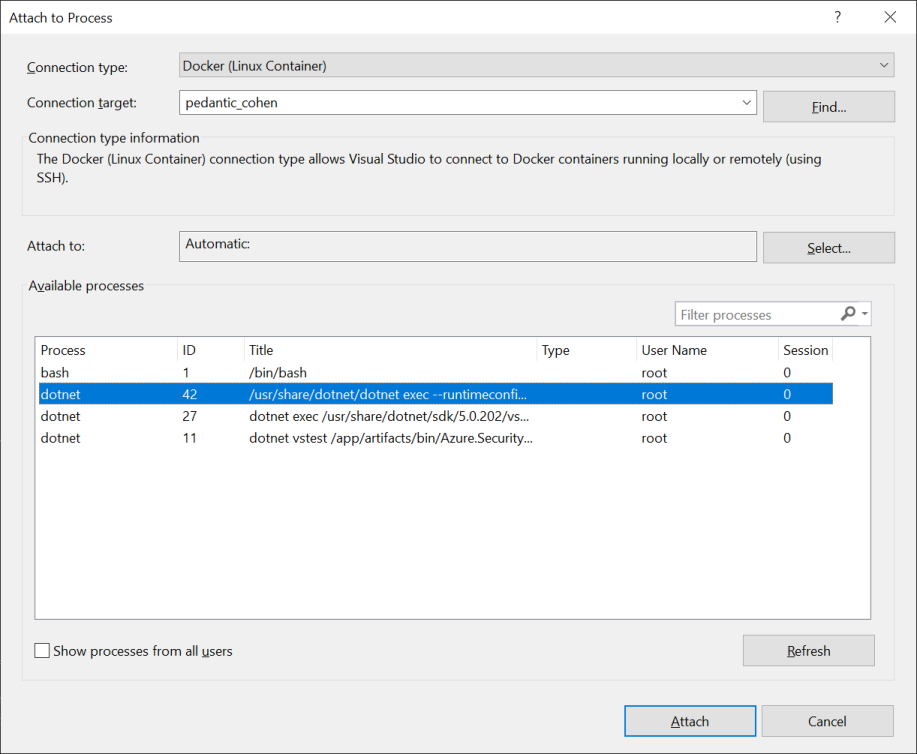
Click Attach to continue.
-
When prompted for the debuggee type, selected “Managed”:
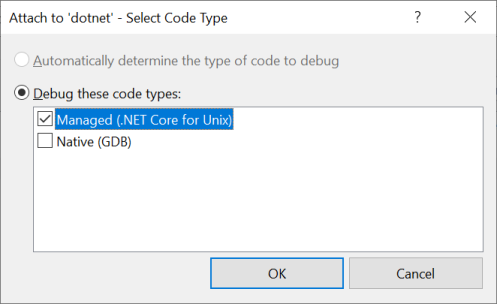
Click OK to continue.
- After a short wait, Visual Studio should start downloading symbols for your project. You might see a message about skipping symbols for optimized binaries, but click the Continue button or press
F5to continue.
You should now be able to debug your code running in Linux on Windows using Visual Studio!
For ASP.NET Core applications, there are great instructions to get started, but even after adding a <PackageReference> to Microsoft.VisualStudio.Azure.Containers.Tools.Targets and setting required properties, I was unable to get this working from launchSettings.json. I’m working with colleagues to figure out how, if possible, and will author another post accordingly.